
TL;DR:
- A documented, zone-by-zone inspection checklist with severity tags is essential for protecting Texas industrial roofs.
- Consistent photo documentation with scale and measurements strengthens warranty and insurance claims.
- Meeting storm-resiliency standards like IBHS FORTIFIED reduces damage risk and expedites recovery.
Texas weather does not forgive neglect. Hailstorms, high winds, and punishing heat cycles create a relentless assault on industrial roofs, and a single overlooked vulnerability can shut down operations, void warranties, or trigger a costly insurance dispute. For property managers and business owners across Texas, the difference between a minor repair and a catastrophic failure often comes down to one thing: a documented, repeatable inspection checklist. This article delivers the criteria, zone-by-zone steps, problem classifications, and storm-resiliency benchmarks you need to protect your commercial building and make defensible decisions every time.
Table of Contents
- Core criteria for an effective industrial roofing checklist
- Zone-by-zone inspection steps for Texas commercial roofs
- Common problem areas and severity classification
- Storm-resiliency standards and checklist benchmarks
- A smarter approach: Documented inspections as your best defense
- Protect your Texas property with expert roofing solutions
- Frequently asked questions
Key Takeaways
| Point | Details |
|---|---|
| Severity classification matters | Classify roof issues as critical, action, or monitor to drive defensible decisions and swift repairs. |
| Storm-resiliency benchmarks | Use IBHS FORTIFIED Commercial standards to prioritize storm-resistant upgrades for Texas properties. |
| Photo and measurement documentation | Document each flagged item with photos and measurements for insurance and warranty defense. |
| Zone-based inspections are essential | Divide your roof into zones and inspect each one to ensure comprehensive coverage. |
| Repeatable digital checklists | Digital templates ensure consistency and make it easier to archive evidence and speed reporting. |
Core criteria for an effective industrial roofing checklist
Not every checklist is created equal. A generic list of items to “check” gives inspectors nothing to measure against and leaves property managers with vague records that won’t hold up in a warranty dispute or insurance claim. An effective industrial roofing checklist starts with three foundational requirements: severity classification, photo documentation standards, and zone-by-zone structure.
Severity classification means every flagged item gets tagged as one of three levels: critical (immediate repair needed), action (repair within a defined timeframe), or monitor (track at next inspection). This simple system converts a passive checklist into an active maintenance plan. A defensible facilities maintenance approach emphasizes documentation and severity-based triage for roof inspections, giving you a clear paper trail that satisfies both insurers and manufacturers.
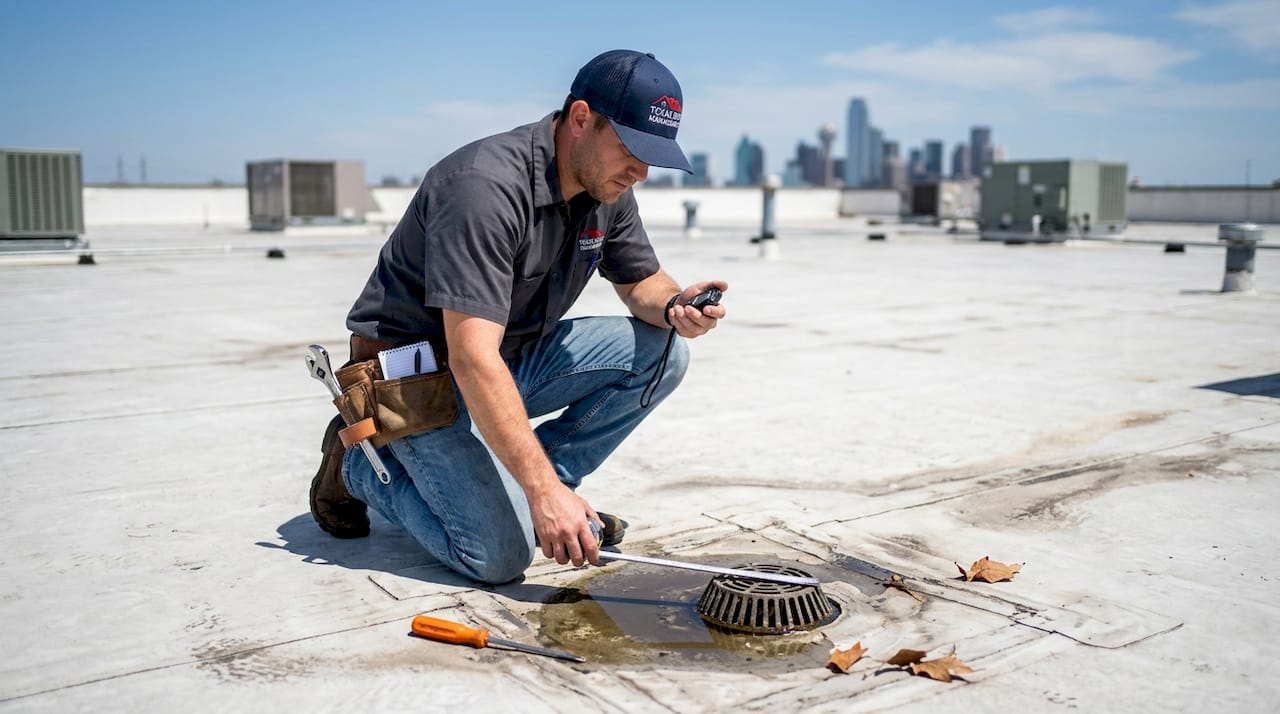
Photo documentation must follow specific standards to be useful. Every flagged item needs at least two photos: one wide shot showing location context and one close-up showing the damage itself. Include a ruler or familiar object for scale. Without scale, a small crack in a membrane can look harmless in a photo when it’s actually a two-inch split that’s actively leaking.
Pro Tip: Always include a measuring tape or a coin next to any damage in your photos. This one habit has saved property managers thousands of dollars in disputed claims.
Zone-by-zone structure ensures nothing gets skipped. Divide the roof into logical sections: perimeter edges, penetrations (HVAC units, pipes, skylights), interior drains, the main membrane field, and all flashings. Assign each zone its own checklist page so inspectors can’t accidentally skip ahead.
Here’s what a strong checklist must include for each zone:
- Acceptance criteria (what does “pass” look like?)
- Measurement fields for gaps, splits, or ponding depth
- Severity tag options (critical, action, monitor)
- Photo attachment slot
- Inspector signature and date
If your current checklist is missing any of these, it’s worth revisiting your roof replacement process documentation to align inspection standards with installation records. For flat roofs specifically, a detailed flat roof inspection guide can help calibrate what your acceptance criteria should look like.
“A checklist without severity classification is just a list. Classification is what turns observations into decisions.”
Buildings that meet FORTIFIED storm standards require documented, repeatable inspection records as part of maintaining their designation. Aligning your checklist with these benchmarks from day one puts you ahead of the process.
Zone-by-zone inspection steps for Texas commercial roofs
With the criteria established, property managers can move step-by-step through the roof inspection zones. A structured sequence prevents skipped areas and keeps inspection time efficient, even on large industrial properties.
-
Prepare before you climb. Gather tools: moisture meter, tape measure, chalk line, camera or phone, and your digital or printed checklist. Review the previous inspection report so you know which items were tagged as “monitor.” Confirm safety equipment is ready and that no work is scheduled on the roof during the inspection.
-
Start at the perimeter edges. Look for lifted or separated edge metal, exposed fasteners, and gaps where the membrane meets the edge flashing. Measure any separation or uplift. Perimeter edges are where wind damage almost always begins in Texas storms.
-
Inspect all penetrations. Each HVAC curb, pipe boot, skylight, and roof hatch is a potential water entry point. Check that flashings are sealed, collars are intact, and no gaps exist between the penetration and the membrane. Tag anything that shows cracking, shrinkage, or separation.
-
Check all drains and scuppers. Clear debris, measure any standing water depth, and verify that drains are seated properly. Ponding water (standing more than 48 hours after rainfall) accelerates membrane deterioration and adds structural load.
-
Walk the membrane field. Look for blisters, punctures, seam separations, and discoloration that may signal moisture intrusion below the surface. Use your moisture meter on any suspicious areas. Inspecting roof damage safely is critical, so stay off obviously soft or compromised areas.
-
Examine all flashings. Base flashings, counter flashings, and termination bars all need visual and tactile checks. Pull gently on termination bars to test adhesion. Any movement is a tag-worthy finding.
-
Document every zone before moving on. Complete inspections zone-by-zone, check each item against stated acceptance criteria, record actual condition with measurement, and photograph each flagged item with context and scale.
Pro Tip: Use a digital checklist app that lets you attach photos directly to each checklist line item. This cuts reporting time by more than half and creates an instantly shareable record for your roofing contractor or insurer.
For flat roof inspection specifically, always document drain flow rate and membrane seam spacing, since these two items are responsible for the majority of flat roof failures in Texas.
Common problem areas and severity classification
After thorough inspection, it’s essential to recognize which issues demand immediate attention and which can be monitored. Texas industrial roofs face a predictable set of vulnerabilities, and knowing how to classify each one correctly protects both the building and your liability.
The most common problems found on Texas industrial roofs include:
- Membrane punctures and splits: Often caused by foot traffic, falling debris, or hail. Even small punctures allow water under the membrane, where it spreads silently.
- Ponding water: Flat and low-slope roofs are especially prone. Ponding adds 5 pounds per square foot for every inch of water depth, stressing the deck.
- Damaged or separated flashings: Flashings fail faster than membranes in Texas heat. Thermal expansion and contraction cycles loosen adhesives and sealants over time.
- Clogged drains and scuppers: A single blocked drain can cause ponding that overwhelms the roof in a heavy rain event.
- Membrane blistering: Trapped moisture between layers heats up and expands, creating bubbles that eventually crack.
For a fuller picture of what can go wrong, the common roof problems affecting Texas commercial buildings cover both structural and surface-level failures worth tracking.
Severity classification in practice:
Severity classification drives immediate repair versus monitoring for flagged items. Here’s how to apply the three levels:
- Critical: Active leak, structural compromise, or damage that exposes the building interior. Requires same-day or next-day contractor contact. Notify your insurer immediately and document with timestamped photos.
- Action: Damage that is not yet causing interior exposure but will if not addressed within 30 to 90 days. Schedule a repair estimate within the week.
- Monitor: Early-stage wear or minor issues that show no immediate risk. Log measurements and re-inspect at the next scheduled cycle.
“The classification tag is your evidence. Without it, every repair is an opinion. With it, every repair is a documented decision.”
For unfamiliar terms like “termination bar,” “base flashing,” or “TPO seam,” brush up on industrial roofing terms before your next inspection cycle. Accurate vocabulary makes your reports more credible and easier for contractors to act on.
Storm-resiliency standards and checklist benchmarks
Now, take your findings and ensure your checklist matches or exceeds recognized storm-resiliency standards. Texas sits in one of the most storm-active regions in the country, and standard building codes often represent the minimum, not the goal.
Storm-resiliency frameworks like IBHS FORTIFIED Commercial use designation levels and focus on reducing storm damage risk. The program has three tiers:
| FORTIFIED level | Key focus area | Checklist requirements |
|---|---|---|
| Roof | Deck attachment, edge metal, and roof cover | Fastener spacing, edge metal gauge, and approved membrane type |
| Silver | Roof + openings (windows, doors) | All Roof level items plus opening protection documentation |
| Gold | Silver + continuous load path | Full structural connection records from foundation to roof |
For most Texas property managers focused purely on roof performance, the FORTIFIED Roof level is the most practical starting benchmark. It specifically addresses the failure points that Texas storms exploit: edge metal uplift, deck separation, and membrane blow-off.
Checklist items that align with FORTIFIED storm benchmarks include:
- Edge metal type, gauge, and fastener spacing documented at installation
- Sealed roof deck (no gaps at seams or penetrations)
- Approved secondary water barrier installed and intact
- Flashings meeting wind uplift resistance requirements
- Drains and scuppers sized for local rainfall intensity
Buildings meeting FORTIFIED Commercial levels have shown significantly reduced recovery times after major storm events compared to code-minimum structures. Insurers in Texas increasingly recognize FORTIFIED designation as a basis for reduced premiums and faster claims processing.
Aligning your checklist with these benchmarks also makes it easier to follow a clear storm repair workflow when damage does occur, since your documentation already matches what insurers and contractors need. Review your full roof maintenance checklist annually to confirm your items still reflect current FORTIFIED requirements, which are updated periodically.
A smarter approach: Documented inspections as your best defense
Here’s a perspective that most roofing articles won’t say directly: the checklist itself is not your protection. The documentation is.
We see property managers every year who have done inspections, walked the roof, and even flagged problems, but they can’t prove any of it because their records are handwritten notes in a folder no one can find. When a major storm hits and the insurance adjuster or warranty rep shows up, those managers are starting from zero. No timestamps, no photos with scale, no severity tags.
Building managers benefit from a documented, repeatable inspection method not just operationally but legally and financially. Consistent photo evidence and severity classification are decisive in warranty disputes and insurance claims. We’ve watched property managers successfully defend against denied claims simply because they had a time-stamped, zone-organized photo archive. We’ve also watched claims fail because the only evidence was a verbal description of damage.
Invest in a repeatable digital checklist system and back up all photo evidence to a cloud archive. Review your flat roof maintenance records and regular roof maintenance logs to confirm you have a consistent, retrievable history. The checklist gets you on the roof. The documentation gets you paid.
Protect your Texas property with expert roofing solutions
A solid checklist tells you what needs attention. Expert contractors give you the options to act on it.
Mister ReRoof works with property managers across Victoria, El Campo, Katy, and the Houston area to deliver durable roofing systems built for Texas conditions. Whether your inspection reveals membrane failure, storm damage, or aging edge metal, we offer metal roof replacement in Victoria and TPO roof replacement in El Campo designed to meet or exceed FORTIFIED benchmarks. From a thorough inspection review to a complete reroof, Mister ReRoof is ready to help you protect your investment. Schedule your free estimate today and turn your checklist findings into lasting protection.
Frequently asked questions
How often should Texas industrial roofs be inspected?
Twice yearly and after every major storm, following a zone-by-zone checklist that checks each item against stated acceptance criteria. Spring and fall inspections catch seasonal wear before peak storm seasons hit.
What documentation is required for insurance compliance?
Detailed measurements, timestamped photos with context and severity tags, and a zone-organized checklist are required. Building managers benefit from a documented, repeatable inspection method that creates a retrievable audit trail for adjusters.
Which storm-resiliency standards are best for Texas roofs?
The IBHS FORTIFIED Commercial Roof, Silver, and Gold levels are the most effective benchmarks. FORTIFIED Commercial is a construction standard designed to minimize storm-damage risk, making it a strong fit for Texas’s severe weather environment.
Why is severity classification important?
Severity tags turn observations into defensible decisions. Severity classification drives immediate repair versus monitoring for flagged items, helping you prioritize work orders and justify costs to stakeholders or insurers.
Can digital checklists improve inspection reliability?
Yes. Digital checklists speed up reporting, enforce consistency across inspectors, and make photo documentation easier to archive. A zone-by-zone inspection method paired with digital templates significantly improves defensibility and reduces the chance of missed findings.