
Texas leads the nation in hail claims, and repair costs can run anywhere from $600 to over $6,500 depending on the damage. Every hour you wait after a storm, water works deeper into your decking, insulation, and walls, turning a manageable repair into a full-blown replacement. Worse, your insurance company expects you to act fast. Delay mitigation, and they have grounds to deny your claim entirely. This guide walks you through a proven, step-by-step workflow for handling storm roof damage in Texas, from the moment the storm clears to the day your new roof is signed off and solid.
Table of Contents
- Prepare for assessment: Safety and documentation
- Full damage inspection and professional assessment
- Navigating Texas insurance claims after storm damage
- Executing repairs and securing a resilient roof
- A Texas roofer’s perspective: What most guides miss
- Get expert help for your Texas roof repairs
- Frequently asked questions
Key Takeaways
| Point | Details |
|---|---|
| Safety first | Never climb on the roof after a storm and document all damage from the ground. |
| Professional assessment | Have a qualified Texas roofer inspect your roof for visible and hidden damage. |
| Smart claims process | File insurance claims promptly, only if damages exceed your deductible and keep receipts for all mitigation. |
| Quality repairs | Choose local, licensed contractors and opt for impact-resistant materials for better future protection. |
| Avoid common pitfalls | Do not hire storm chasers or agree to waiver of deductibles, and always stay involved through completion. |
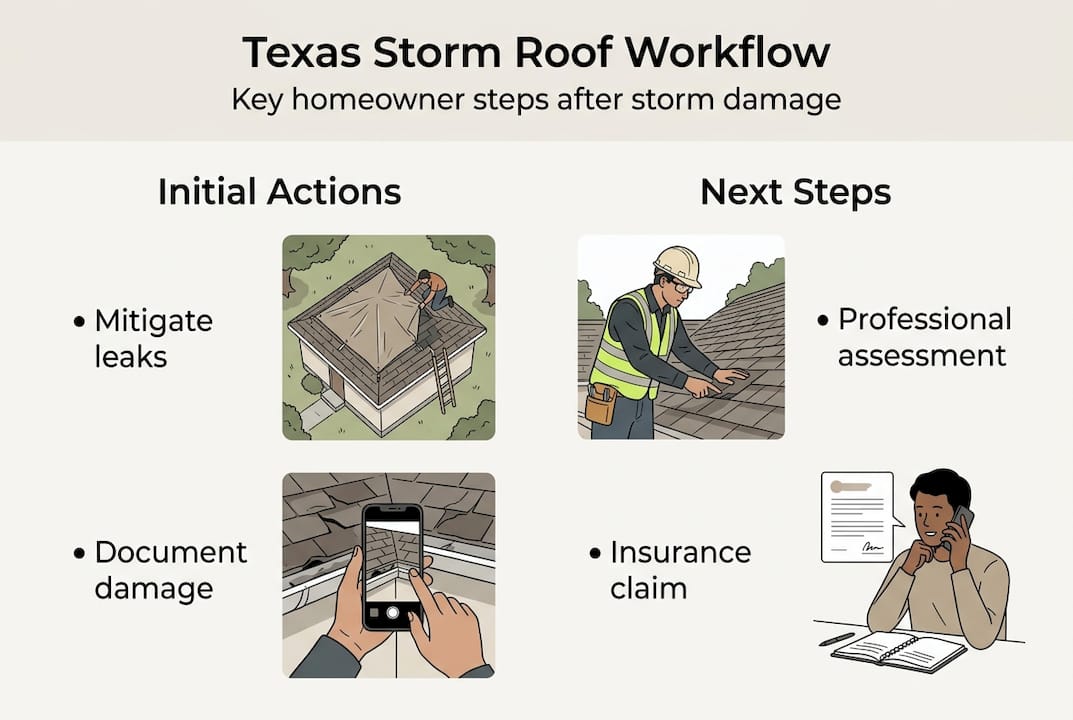
Prepare for assessment: Safety and documentation
The first instinct after a storm is to climb up and see the damage yourself. Resist it. Wet shingles, broken decking, and hidden soft spots make post-storm roofs genuinely dangerous. A fall from a single-story roof can be fatal, and the damage will still be there once conditions are safe.
Safety warning: Never walk on your roof immediately after a storm. Hidden punctures, waterlogged decking, and dislodged materials create fall hazards that are not visible from the edge. Wait for a professional.
Your first job is to mitigate further damage from the inside. Place buckets under active drips, move valuables away from wet areas, and if you can safely access the exterior from a ladder, cover obvious breaches with a heavy-duty tarp. Secure the tarp with weights or boards, not nails, to avoid adding more holes. These steps matter because mitigation and documentation are the first things your insurer will ask about.
Once you’ve stabilized the interior, start building your evidence file. Walk the perimeter of your home and shoot photos and video from the ground. Capture wide shots for context, then close-ups of every dent, crack, missing shingle, and debris impact point. Make sure your phone’s timestamp feature is active.
Pro Tip: Upload all photos and videos to a cloud folder the same day. If your phone is lost or damaged, your evidence survives.
For insurance purposes, timestamped photos and videos with scale references (like a coin next to a hail dent) carry far more weight than general snapshots. The more specific your documentation, the harder it is for an adjuster to minimize your claim.
Essential tools and materials for mitigation and documentation
| Item | Purpose |
|---|---|
| Heavy-duty tarp (6 mil or thicker) | Cover roof breaches to stop water intrusion |
| Buckets and towels | Contain interior leaks |
| Smartphone with timestamp enabled | Document all damage with date and time |
| Coin or ruler | Provide scale reference in close-up photos |
| Ladder (use carefully) | Ground-level access for tarp placement only |
| Cloud storage account | Secure backup of all photo and video evidence |
Also review your hail damage checklist before calling your insurer, so you know exactly what to look for and report.
Full damage inspection and professional assessment
Once you’ve gathered initial documentation, the next step is an accurate, comprehensive assessment. This is where many homeowners make a costly mistake: they skip the professional roofer and go straight to the insurance adjuster. That’s backwards.
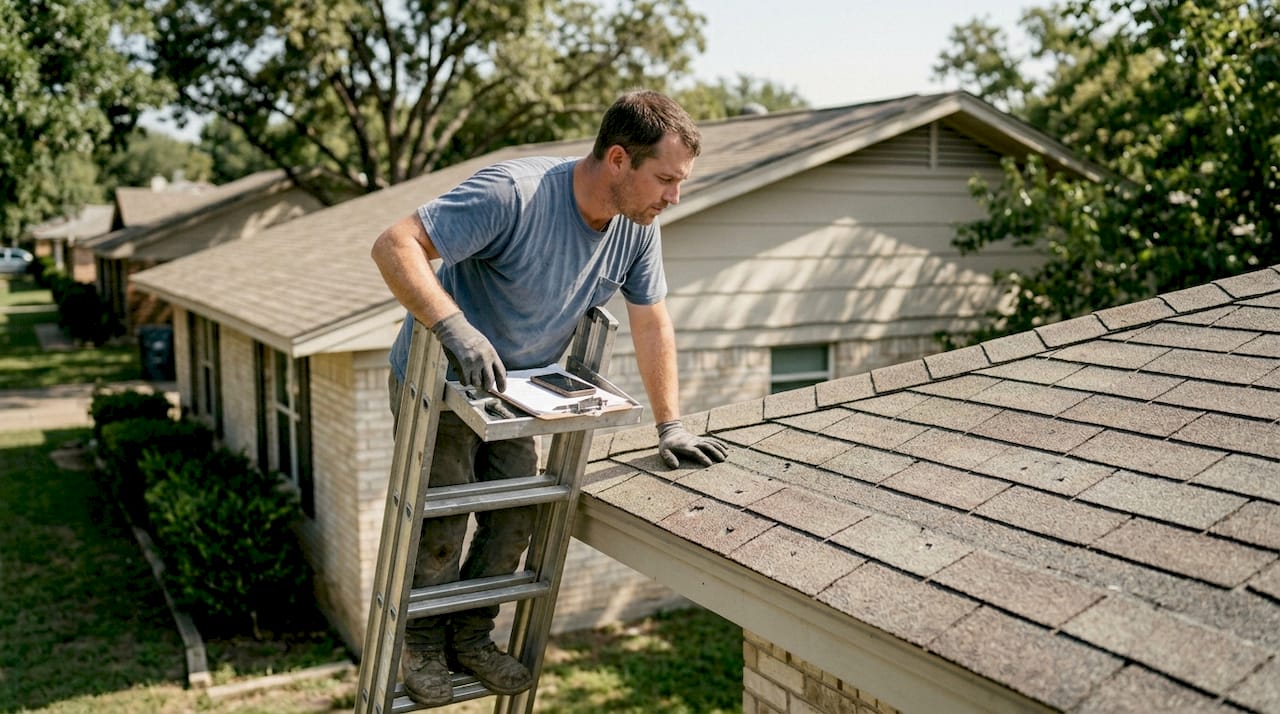
A professional inspection is safer and catches hidden damage that you and even some adjusters will miss. Pros use drones, moisture meters, and trained eyes to find damage inside the attic, under flashing, and along valleys where water pools. If your roof is 15 to 20 years old, there may be pre-existing wear that complicates the claim, and a roofer can help separate storm damage from age-related wear.
Signs of storm damage to look for (from the ground):
- Missing, curled, or cracked shingles
- Granule loss visible in gutters or downspout runoff
- Dented or bent metal flashing around chimneys and vents
- Sagging or discolored ceiling spots inside the home
- Dented gutters or fascia boards from hail impact
- Visible daylight through attic boards
- Moisture or mold smell in the attic
For flat roofs and commercial-style surfaces, review flat roof inspection tips since damage patterns differ from pitched shingle roofs.
DIY inspection vs. professional roofer assessment
| Factor | DIY inspection | Professional roofer |
|---|---|---|
| Safety | High risk on wet or damaged surfaces | Trained for post-storm conditions |
| Hidden damage detection | Limited to visible areas | Attic, decking, and flashing included |
| Insurance documentation | General photos only | Detailed written report with repair scope |
| Adjuster credibility | Homeowner opinion | Licensed contractor estimate |
| Cost | Free | Often free for storm claims |
Having your roofer present at the adjuster’s visit is one of the smartest moves you can make. A roofer as your advocate ensures the adjuster doesn’t overlook key repairs or undervalue the scope of work. For shingle-specific concerns, shingle repair guidance can help you understand what a proper repair scope should include.
Pro Tip: Get at least two roofer bids before signing any contract. This protects you from inflated pricing and gives you leverage if the insurance estimate comes in low.
Navigating Texas insurance claims after storm damage
A thorough inspection sets you up for the all-important insurance claim phase. File your claim as soon as possible. Texas law gives you up to one year to file after a storm, but waiting works against you. Damage worsens, evidence fades, and adjusters grow skeptical of late claims.
When you file, submit your timestamped photos, your roofer’s written estimate, and a description of all mitigation steps you took. This shows good faith and reduces the insurer’s ability to dispute coverage.
Understanding your payout structure is critical. Settlement comes in two parts: first, the Actual Cash Value (ACV), which is the repair cost minus depreciation, then the Recoverable Cash Value (RCV), which is the remaining balance paid after the work is completed and verified. Don’t spend the ACV check before repairs are done, or you may not have enough to cover your contractor.
Texas law note: It is illegal for any contractor to waive, absorb, or rebate your insurance deductible in Texas. If a roofer offers to “cover your deductible,” walk away. This is insurance fraud and can void your claim.
Common mistakes that can hurt your claim:
- Waiting too long to file or mitigate
- Signing a contract with a roofer before the adjuster visit
- Failing to document mitigation steps
- Accepting the first adjuster estimate without a roofer review
- Allowing a contractor to waive your deductible
- Not requesting a re-inspection if the estimate seems low
For a deeper look at how coverage works, review roof repair insurance basics and use a roof replacement checklist to make sure nothing falls through the cracks.
Pro Tip: Only file a claim if your documented damage clearly exceeds your deductible. Filing small claims can trigger premium increases that cost more over time than paying out of pocket.
Executing repairs and securing a resilient roof
After your claim is processed, it’s time to ensure your new roof stands up to the next storm. The contractor you choose at this stage matters more than most homeowners realize.
Avoid “storm chasers,” which are out-of-state contractors who flood Texas neighborhoods after major weather events, offer rock-bottom prices, and often disappear before warranty issues arise. Vet every contractor by checking their Texas license, verifying local references, and confirming they carry general liability and workers’ comp insurance.
Steps from contract to project completion:
- Confirm the contractor’s scope matches the adjuster-approved estimate
- Review the contract for warranty terms, material specs, and payment schedule
- Verify permits are pulled with your local municipality
- Schedule a pre-job walkthrough to confirm material delivery and staging
- Monitor installation for proper underlayment, flashing, and ventilation
- Request a final inspection and sign-off before releasing the last payment
- Submit completion documentation to your insurer to release the RCV balance
For the best long-term results, ask about upgrades during the replacement. Class 4 impact-resistant shingles can qualify you for insurance discounts and dramatically improve your roof’s ability to handle future hail. Many Texas insurers offer premium reductions of 15 to 30 percent for Class 4 rated materials.
Over 60% of U.S. roof replacements involve insurance, which means contractors in Texas deal with claims every day. A good local roofer knows how to work within the adjuster’s scope while flagging items that were missed.
For more guidance, explore roof replacement tips and the full roof replacement workflow to know exactly what to expect from start to finish.
Longevity strategies after replacement:
- Schedule a professional inspection every two years, not just after storms
- Ensure proper attic ventilation to prevent heat-related shingle degradation
- Keep gutters clear to prevent water backup under the eaves
- Trim overhanging branches that can scrape or puncture roofing materials
- Address minor flashing issues before they become leak sources
A Texas roofer’s perspective: What most guides miss
Most storm repair guides walk you through the steps, but they skip the part that actually determines whether you come out ahead: active homeowner involvement and local contractor knowledge.
The biggest missed opportunity we see is the supplement. When hidden damage shows up during tear-off, which happens often on older roofs, professional advocacy can increase your payout significantly. A supplement is simply an updated claim for damage that wasn’t visible during the initial adjuster visit. Most homeowners don’t know to ask for it, and some contractors don’t bother because it takes extra paperwork.
Always ask your roofer directly: “Will you advocate for supplements if we find additional damage during tear-off?” Their answer tells you a lot about how they operate.
“Storm chasers promise the world but disappear when it’s time to honor the warranty. Work with locals who know Texas law, know your county’s permit process, and will still be here next season.”
For a deeper look at what separates a strong claim from a weak one, the hail damage expert tips resource covers exactly what adjusters look for and how to make sure nothing is left on the table.
Get expert help for your Texas roof repairs
You now have the full workflow. But knowing the steps and executing them well are two different things. Partnering with a local Texas roofer who understands insurance claims, local building codes, and the specific weather patterns in your area makes every step faster and less stressful.
Mister ReRoof works with homeowners across El Campo, Houston, and surrounding communities to handle storm damage repairs from first assessment to final sign-off. Whether you need metal roof replacement in Victoria, flat roof replacement in El Campo, or shingle roof replacement in Hallettsville, our team brings the local expertise and insurance knowledge you need. Contact Mister ReRoof today for a free estimate and get your roof back to full strength.
Frequently asked questions
How quickly should I mitigate storm roof damage in Texas?
You should take mitigation steps within days after the storm to prevent additional damage and ensure your insurance claim isn’t denied. Delays give insurers grounds to reduce or deny your payout.
What documents do I need for my roof repair insurance claim?
Provide timestamped photos and videos along with a written repair estimate from a licensed roofer. The more specific and organized your documentation, the smoother the claims process.
Is it illegal for a Texas roofer to waive my deductible?
Yes, waiving deductibles is illegal in Texas and constitutes insurance fraud. Any contractor who offers this is a red flag, and accepting it can void your entire claim.
How much does storm roof repair cost in Texas?
Repair costs range from $600 to over $6,500 depending on damage severity, roof type, and materials. Most storm-related repairs are partially or fully covered by homeowners insurance.
What’s the difference between ACV and RCV in roof claims?
ACV is your initial payout minus depreciation, while RCV is released after repairs are completed and verified. You need to finish the job before you receive the full settlement amount.