
Gulf Coast storms in Houston, Texas, make roof safety more than just a checklist item for every property owner. Between sudden downpours and intense sun, flat roofs in this region face frequent risks of water damage that rarely reveal themselves until repairs become costly. This guide offers safe and thorough flat roof inspection steps to help you spot problems early, protect your investment, and keep every inspection accident-free.
Table of Contents
- Step 1: Prepare for a Safe Flat Roof Inspection
- Step 2: Assess the Roof Surface for Visible Damage
- Step 3: Evaluate Drainage and Penetrations
- Step 4: Document Findings and Plan Next Steps
Quick Summary
| Key Point | Explanation |
|---|---|
| 1. Complete Interior and Exterior Check | Inspect ceilings and walls for water damage, and examine the building perimeter for visible signs of issues before accessing the roof. |
| 2. Ensure Ladder Safety | Position your ladder at a 75-degree angle on stable ground to prevent falls and ensure stability. |
| 3. Thoroughly Inspect Roof Surface | Methodically scan for cracks, separations, and blistering to identify potential leaks or costly damage before they worsen. |
| 4. Assess Drainage and Penetrations | Evaluate water flow and check penetrations for proper flashing to prevent leaks and structural damage due to pooling water. |
| 5. Document Findings Clearly | Take detailed notes and photographs of issues to create an actionable maintenance plan, helping to avoid future emergencies. |
Step 1: Prepare for a Safe Flat Roof Inspection
Before you or a professional climbs onto your flat roof, you need to set up conditions that prevent accidents and make the inspection run smoothly. This step takes just 30 minutes but makes the difference between a safe inspection and a risky one.
Start inside your home by checking for water damage or leaks on your ceilings and interior walls. Look for water stains, discoloration, or soft spots in drywall and insulation. Open your attic access if you have one and scan for moisture, mold, or damaged insulation. These interior clues tell you where problems might be on the roof above.
Next, walk around your building’s perimeter and look for damage signs at ground level.
Check for the following exterior indicators:
- Debris piled against the foundation or gutters
- Visible cracks in exterior walls
- Water pooling or staining near the base
- Damaged siding or trim that suggests roof runoff issues
- Vegetation growing too close to the roofline
Once you’ve completed your interior and exterior walkthrough, prepare the roof access area itself. Clear away leaves, branches, and debris from the flat roof’s edge so nothing blocks your path. Check that your ladder is in good condition with no bent rungs or loose bolts. Position it at a 75-degree angle against the roof edge—not too steep, not too flat. Make sure the ground beneath the ladder is level and solid, not soft soil or loose gravel.
Safety guidelines for ladder use recommend the buddy system, so arrange to have someone present during the inspection. This person stays on the ground or inside and watches for any issues. They’re your second set of eyes if something goes wrong. Never inspect a flat roof alone.
Check for hazards that could cause trips or falls once you’re on the roof. Look for exposed pipes, wires, or equipment that might be in your path. Scan the surface for obvious damage or wet spots that could be slippery. If recent rain has fallen, wait for the roof to dry completely before accessing it.
Create a simple checklist of what you want to inspect while up there. Write down specific areas or concerns you’ve noticed. This keeps you focused and organized during your limited time on the roof.
Proper preparation cuts inspection time in half and eliminates most preventable accidents.
Once your ladder is stable, your buddy is in position, and your checklist is ready, you’re set to move forward.
Pro tip: Schedule your inspection on a dry, clear day in the morning when visibility is best and the roof surface is coolest—this helps you spot subtle damage and prevents heat-related discomfort during the climb.
Here’s a summary of flat roof inspection safety essentials:
| Safety Practice | Why It Matters | Best Practice Example |
|---|---|---|
| Ladder Placement | Prevents falls, instability | 75-degree angle on level ground |
| Buddy System | Immediate help in emergencies | One person stays on ground |
| Roof Surface Preparation | Reduces tripping hazards | Remove debris from roof edge |
| Scheduling Inspection | Improves comfort, visibility | Dry, cool morning hours |
Step 2: Assess the Roof Surface for Visible Damage
Now that you’re safely on the roof, your main task is to systematically scan the entire surface for damage. You’re looking for anything that could allow water to penetrate and cause leaks inside your home. This is where you’ll catch problems before they become expensive repairs.
Start at one corner and work methodically across the entire roof surface. Don’t rush this part. Walk slowly and deliberately, looking down at your feet and the surrounding area as you move. Your eyes need to catch cracks, separations, and deterioration that might be small but significant.
Watch for these common damage indicators:
- Cracks or splits in the roofing material itself
- Blistering, ponding water, or soft spots on the surface
- Seam separations where roof panels or sheets have pulled apart
- Worn, loose, or missing flashing around penetrations
- Punctures, holes, or torn sections of membrane
- Stains or discoloration suggesting previous water damage or leaks
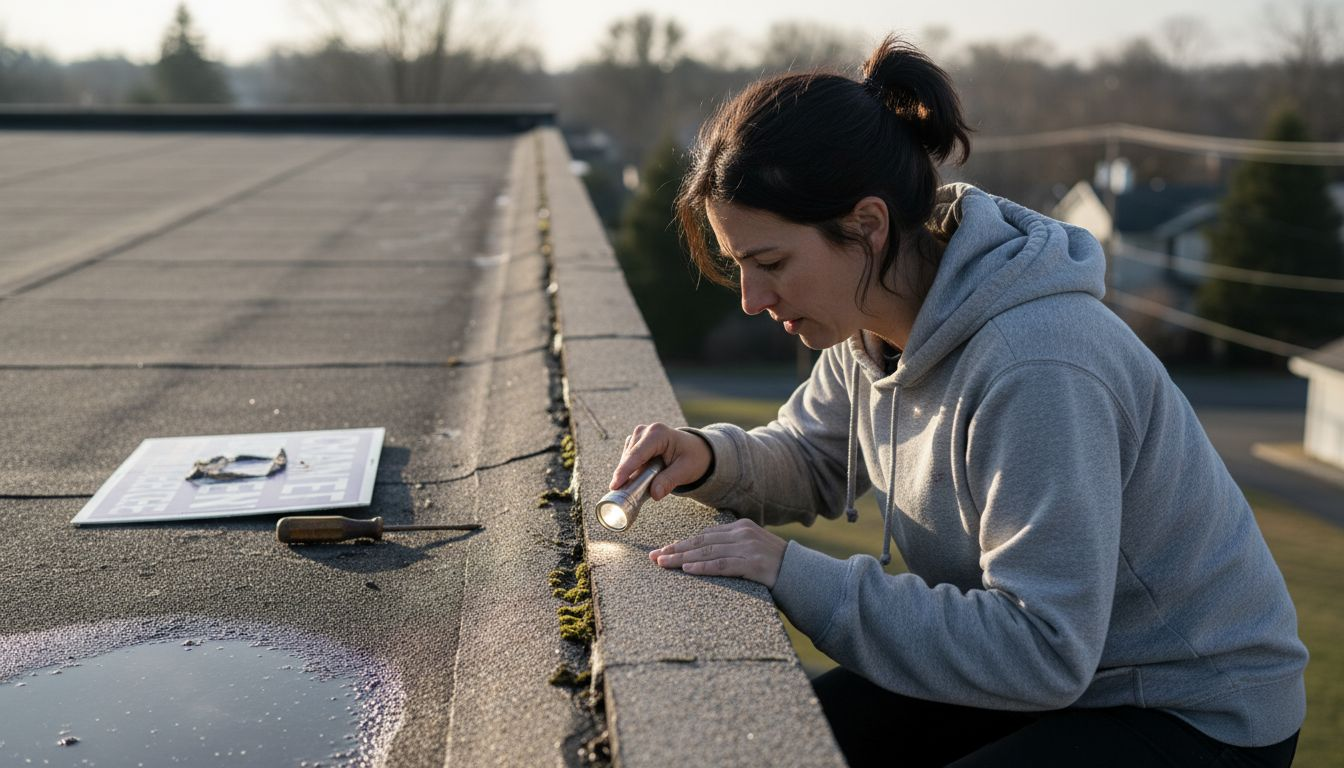
Pay special attention to vulnerable areas where problems start. Roof penetrations like vents, pipes, and chimneys create weak points where proper flashing and sealing must stay intact to prevent water entry. Check these areas thoroughly. Run your hand along the seams and joints to feel for separation you might not see with your eyes alone.
Look for signs of Houston’s heat and humidity damage. The intense Texas sun degrades roofing materials faster than in cooler climates. You may see material becoming brittle, curling at edges, or losing flexibility. Take photos of any damage with your phone so you have documentation to show a professional contractor.
Don’t overlook the edges and corners where your flat roof meets walls or parapets. Water often pools or drains differently in these transition areas. Check for signs of roof damage that indicate leaks or underlying deterioration. If you spot water marks, staining, or growth, document it.
Once you’ve completed your visual scan, step back mentally and consider what you found. Is the damage minor surface wear or something that needs professional attention? Most flat roofs benefit from professional repair rather than DIY attempts.
Compare types of roof damage and their urgency:
| Damage Type | Typical Cause | Urgency Level |
|---|---|---|
| Cracks in membrane | Aging, weather exposure | Moderate |
| Pooling water | Poor drainage, blocked gutter | Moderate to urgent |
| Missing flashing | Improper installation, storms | Urgent |
| Interior leaks | Severe weather, roof failure | Urgent |
Document everything with photos and notes—this information becomes invaluable when getting repair quotes from contractors.
Pro tip: Bring a flashlight even during daylight to shine into cracks and seams, revealing damage you’d otherwise miss, and wear light-colored clothing to stay cooler as you conduct your thorough inspection.
Step 3: Evaluate Drainage and Penetrations
Drainage and penetrations are where most flat roof problems originate. Water that doesn’t drain away pools on the surface, causing leaks and structural damage. Penetrations like vents and pipes are natural weak spots where water sneaks inside. This step identifies these vulnerabilities before they become costly repairs.
Start by examining how water flows across your roof. Look for the slope or pitch that directs water toward gutters or drainage points. Even a slight slope matters on a flat roof. If your roof appears completely flat with no directional flow, that’s a red flag. Stand back and mentally trace where rainwater would travel during a storm.
Now focus on drainage system inspection. Check your gutters and downspouts for debris, leaves, or blockages that could trap water. Clear gutters are critical in Houston’s rainy climate. Look for pooling or standing water anywhere on the roof surface, which indicates poor drainage. Blocking or damage in drainage systems causes ponding water, a primary cause of flat roof leaks.
Evaluate all roof penetrations systematically:
- HVAC vents and exhaust pipes
- Plumbing vent stacks
- Chimney structures
- Skylights or roof windows
- Antenna mounts or satellite dishes
- Electrical conduits
For each penetration, verify that proper flashing and sealing are continuous and integrated into the roof’s water control layers. Flashing should overlap the roofing material in a shingle pattern, shedding water downward and away. Look for deteriorated caulk, gaps, separations, or cracks around the base of each penetration. These are entry points for water. Run your hand along the seams to feel for movement or separation.
Pay attention to penetrations on the roof’s lower side if your roof has any slope. Water naturally flows toward these points, concentrating moisture problems. Inspect them extra carefully.
Check for corrosion or rust on metal penetrations and flashing, especially in Houston’s humid environment. Rust indicates the protective coating is compromised. Water can penetrate behind rusted areas and cause hidden damage inside your building.
Penetrations are the most common source of flat roof leaks, so thorough inspection here saves thousands in future repairs.
Pro tip: Use a moisture meter on spots around penetrations to detect hidden moisture that visual inspection might miss, revealing problems before they develop into visible leaks.
Step 4: Document Findings and Plan Next Steps
Your inspection notes and photos are only valuable if you organize them into a clear record. Proper documentation transforms your inspection into actionable information for repairs and maintenance planning. This step takes your raw observations and turns them into a roadmap for protecting your roof.
Start by writing down everything you observed while memories are fresh. Include the inspection date, weather conditions, and time of day. Note the roof material type, age if you know it, and overall condition rating from good to poor. Be specific about locations using roof areas like north side, near the HVAC unit, or corner by the parapet.
Create a detailed findings list organized by category:
- Drainage issues (pooling locations, blocked gutters, missing slope)
- Penetration problems (loose flashing, deteriorated caulk, rust or corrosion)
- Surface damage (cracks, blisters, punctures, seam separations)
- Interior evidence (stains, moisture, mold from your initial walkthrough)
For each finding, rate its severity as minor, moderate, or urgent. A missing caulk seal is minor. Standing water pooling is moderate. Active interior leaking is urgent. This prioritization helps contractors and insurance companies understand what needs immediate attention.
Photograph every issue you found. Include wide shots showing the overall area and close-ups of specific damage. Photos dated automatically by your phone are valuable proof. Comprehensive roof inspection reports document findings with detailed photographs to create a clear record of conditions.
Once your documentation is complete, assess whether you need professional help. Minor cosmetic issues might wait. Moderate damage should be scheduled for contractor repair within the next few months. Urgent problems need immediate professional attention. Call Mister ReRoof or another qualified Houston roofing contractor to review your findings and provide repair estimates.
Develop a maintenance action plan based on what you found. Action plans and prioritization for remedial work support effective roof maintenance. Schedule any needed repairs, set reminders for the next inspection in 6 to 12 months, and note seasonal maintenance tasks like gutter cleaning before hurricane season.
Written documentation protects both your roof and your wallet by preventing small problems from becoming expensive emergencies.
Pro tip: Create a digital folder on your phone with all inspection photos labeled by date and location, then email copies to yourself for backup—this creates an inspection history that tracks your roof’s condition over years.
Protect Your Houston Flat Roof with Expert Inspection and Repair Solutions
A thorough flat roof inspection uncovers hidden problems like cracks, pooling water, and faulty flashing that threaten your home’s safety and comfort. With Houston’s unique heat and humidity challenges, addressing drainage flaws and penetrations early is critical to avoid costly leaks and structural damage. If your inspection reveals surface damage or urgent leaks you cannot fix yourself, turning to a trusted professional ensures durable, storm-resistant repairs tailored specifically for your flat roof needs.

Don’t let minor roof issues turn into major expenses. At Mister ReRoof, we specialize in comprehensive flat roof repair and replacement services designed for Houston’s climate. Benefit from our expert assessment, quality craftsmanship, and commitment to long-lasting solutions. Schedule your free estimate today to secure your home and roof with confidence. Visit our site now at Mister ReRoof to get started.
Frequently Asked Questions
How often should I conduct a flat roof inspection?
Conduct a flat roof inspection at least once every six months, and more frequently after severe weather events. This regularity helps identify any potential issues before they escalate into costly repairs.
What signs of damage should I look for during a flat roof inspection?
Look for cracks, blisters, and signs of water pooling on the roof surface. Make note of any missing flashing or discoloration, as these can indicate underlying problems.
How do I prepare my flat roof for inspection?
Before inspecting, clear debris around the roof edge and ensure your ladder is securely positioned at a 75-degree angle. Conduct a preliminary check inside your home for water damage on ceilings and walls to inform your inspection efforts.
What are the risks of not inspecting my flat roof regularly?
Neglecting regular inspections can lead to unnoticed water infiltration, resulting in structural damage and mold growth. Prevent significant repair expenses by staying proactive with regular maintenance and inspections.
Should I hire a professional for my flat roof inspection?
If you observe any signs of severe damage or are uncomfortable climbing onto the roof, it’s best to hire a professional. They have the experience and tools necessary to thoroughly assess the roof’s condition and address any issues effectively.
What documents should I keep after my flat roof inspection?
Keep a detailed record of your findings, including inspection dates, observations, and photographs of any damage. This documentation will help track the roof’s condition and assist contractors during future repairs.
Recommended
- 7 Smart Flat Roof Design Ideas for Houston Homeowners
- Flat Roof Repair Steps for Lasting Houston Results
- Flat Roof Repair Workflow for Houston Properties
- 7 Essential Roof Maintenance Tips for Houston Homeowners
- Askel askeleelta aurinkosuojaus kotiisi helposti – Tiimixi
- Roofing Contractor El Campo TX
- Metal Roof Replacement El Campo TX
